I recently picked somebody on one of Craftster's swaps (yeah, I like these swaps)for a surprise item. One thing on her list was a Jess Hutchinson knitted robot The pattern's no longer for sale, but the pictures looked clear, and it seemed like an interesting challenging. And they're cute!
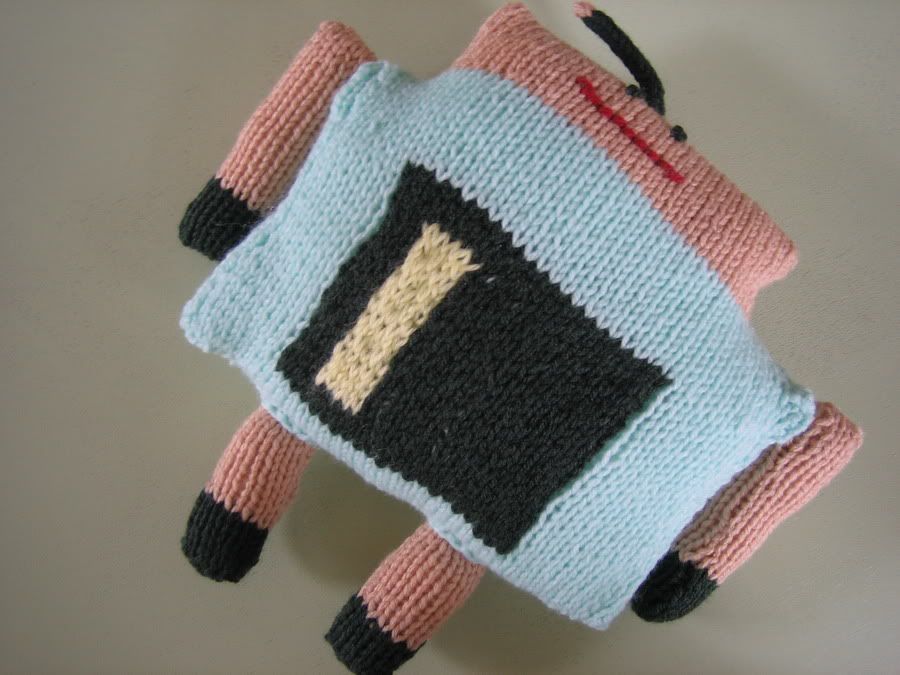
So, after looking (many times) at the pictures, I made this
These are my notes on how I knit the robot - I haven't seen the real pattern (heck, I haven't even seen a Jess Hutchinson robot in real life :) ) and I'm in no way claiming the robot as my own. And if you're looking for a line-by-line pattern, it won't be here. I'm writing my notes, not a pattern. (Actually, my 'notes' on paper are one sheet of 3"x5" (about 8cm x 12.5cm) note paper.)
I used 4 colors of worsted weight acrylic yarn I had in stash, I have no idea how much. One pair of size 4mm knitting needles, worked flat (9" straight needles if you really want to know) 2 dpns is also handy as stitch holders for the head.
It's all stockinette. I say knit in the notes, but it may actually be a purl row. Use your own judgement and fudge* when/if necessary. There's also NEXT TIME notes scattered here & there that should be looked at before starting. (added 4/27/09 - also see this entry)
Color A - feet, hands, large rectangle in front/back of body, part of the antennae
Color B - legs, arms, face, part of the antennae
Color C - body
Color D - small rectangle in front of body
Short lengths for eyes & mouth
Legs - 2 rectangles, 12 stitches across. Cast-on starting at the feet. 5 rows of color A, 13 rows of color B. I didn't cast off. I did both legs together by casting on 12 stitches, then using the other end of the ball and cast on another 12 stitches. Made it much easier to be sure both were the same length. When I finished the rectangles, I put both on stitch holders (iow, I cut a long tail, and threaded it through the stitches). I sewed the bottom & side of the leg shut into a tube, stuffing it as I went. I used the cast-on tail to sew the foot shut, and the start of the leg-color yarn to sew those rows.
Arms - 2 rectangles, 12 stitches across. Cast-on starting at the hand, 7 rows of hand, 23 of arm. Done the same way as the leg, except that I sewed the whole thing closed - I didn't leave the cast-off end open since I wasn't attaching the top of the arms to anything.
Body - I did the flat, starting at the bottom front and working 'up and over' to the bottom back. With color C cast on 43 (3 for right side, 37 for front (and back), 3 for left side) On the first row, I attached the legs by knitting together one body stitch to one leg stitch 6 times (the other 6 leg stitches is attached to the back during cast-off). I attached the legs so there's 7 body stitches in between them. I knit 5 rows and on the next row started the front rectangles.
Front rectangles - 3 rows of color C for 11 stitches, color A for 21 stitches, rest in color C. On the next row I started the small rectangle so it's on the left on the knit side (I don't know if this row is knit or purl). The large rectangle is now knit as (on the knit side)13 stitches color A, 5 stiches color D, 3 stitches color A for 13 rows. End color D and do 3 more rows of color A, then end color A.
I did 8 more rows of body in color C, then 3 more rows before starting the back. These 3 rows are the 'shoulder' of the robot.
The back was 8 rows of color C, then another large rectangle with color A. I did the back rectangle over the same stitches & rows as the front. Instead of doing the same large/small rectangle design, after the first row of the rectangle was done, I kept the first & last stitch in color A, and did a semi-random color pattern using colors A and C. I did a few stitches in color C randomly. On the next rows, I followed the cellular automation knit rule I found on Shifting Visions website which says If the stitch on the tip of your left hand needle (the one you're about to knit into) is a different color from the stitch on the tip of your right hand needle (the one you just knit), work the stitch in CC. If they are the same color, work the stitch in MC I used color C as the contrasting color (CC) and color A as the main color (MC) On the 19th row, I did all stitches in color C to end the rectangle.
I did 8 more rows of C to finish the body, on the last row, I attached the legs like I did in the front. I didn't like how the join between the body & legs looked in the front or back, so I did crochet slip-stitch chain to make it look better. NEXT TIME - instead of knitting the body & leg together on the front cast-on, use the leg stitches AS the body (cast on ?? body stitches, pick up the leg stitches, then cast on 7, pick up the leg stitches, cast on the rest of the body), then graft the back body to the legs or something to be figured out later.
Head - I used Elizabeth Zimmermann's 'afterthought pocket' trick to make the head. On the center row (the middle of the 3 'shoulder' rows), I cut the center stitch and undid 14-15 stitches on each side. I put the new stitches on 2 dpns so it's 30 front, 30 back. Starting at the front, I used color B and knit 25 rows, then grafted to the 30 back stitches. NEXT TIME - instead of the afterthought pocket - I'm going to the knit the head stitches with waste yarn, then undo the waste yarn and knit them that way. And instead of doing 30 stitches, I'll do the head will be the same width as the large rectangle (no reason except that the head looked a little wide for the body to me with 30 stitches)
I did the eyes & mouth, then grafted the sides of the face, the bottom and one side of the robot closed.
I stuffed the body & head - not real tight, the pictures didn't look like it was a 'puffy' robot - then grafted the last side and sewed the arms to the top of the body. NEXT TIME - when seaming the sides and arm, leave a few stitches at the top undone and seam the arm & body together. I think it'll look neater.
The antennae, I just picked up 3 stitches from the top center of the head and did 8 icord rows of color B, then 2 of color A and ended off.
* while eating chocolate fudge (or any other flavor) is a worthwhile activity, it is not necessarily the best thing to do while knitting since chocolate can stain. However, the fudge mentioned here is the infamous 'fudge factor' whereby you ignore the actual notes written here and do what makes sense based on the knitting in your hands.
No comments:
Post a Comment