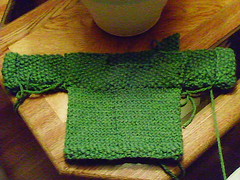
I got some zebra buttons that I need to sew on, and finish off the yarn ends but other than that, it's done.
Stacie’s Sweater –
Size 11 (8mm) dpns
Lion Brand Chunky, 1 5oz skein, 153yds
Stitch holders that you can take the stitches off from either end (I used waste yarn)
Buttons
Gauge in seed stitch: 6st/10rows = 2”
Gauge in crossed stockinette: 5 st/9rows = 2”
Finished measurements- 20” at underarm, 10” long shoulder to hem
Abbreviations –
K – knit
P – purl
K2T – knit 2 together
P2T – purl 2 together
Stitch patterns:
Seed stitch: k1 p1 around. On row 2 and next rows, continue the k1p1 (you’ll be knitting the purls and purling the knits)
Crossed Stockinette – Row 1: Knit each stitch, Row 2: knit every stitch through back loop, repeat these 2 rows
I knit this sweater ‘on the fly’ so to speak, the instructions match what I did, but I also put ‘what might work better next time’ notes so be sure to read through everything first, you might want to try the ‘what might work better next time’ option, but keep in mind, I haven’t actually KNIT those options. Yet.
The sweater starts at the bottom hem, in the round until the underarms. Then the back & sleeves are done flat to the shoulder, the sleeves continue over the shoulder and down the front. The front is worked up from the underarm to the shoulders.
Sweater body– starting at bottom hem and working in the round:
Cast on 59 stitches and join, do not twist.
Do seed stitch for 1” (about 4 rows)
Do Crossed Stockinette until sweater body measures about 6 ½” from cast-on, after doing a knit row. This is the underarm point.
Put the next 30 stitches (front of sweater) on a holder. The rest of the sweater is knit flat (and yes, I did it all on 8” long dpns because they’re the only size 11 needles I’ve got)
Back of sweater:
Cast on 17 stitches, do seed stitch across, and cast on another 17 stitches. (The 2 groups of 17 stitches are the sleeves – use a provisional cast-on if that’ll make it easier for you to do the underarm seam.)
Do seed stitch until sweater measures 10” from cast-on, ending at the right edge (as seen from the back of the sweater).
Sleeve 1 –
Seed 17 stitches, and put the rest of the back stitches on a holder. Seed the 17 sleeve stitches until the front sleeve is the same as the back sleeve length (about 4”) . Cast off and sew the underarm seam. I grafted the 2 edges together in a knit stitch.
Sleeve 2 –
Take the 20 stitches at the other end of the back holder (there’s 14 center stitches – neck- still on the holder) and seed until the front sleeve is the same as the back sleeve length (about 4”) . Cast off and sew the underarm seam, putting the 3 stitches closest to the body on a holder.
Sweater front –
(If you know the ‘sliding loop technique’ use that to attach the front to the sleeve 1 stitches, otherwise you’ll have to sew the front to the sleeve 1 stitches, or use whatever technique you know to attach the front to the sleeve 1 stitches as you go.)
Pick up the 30 front stitches from the holder, and starting at the sleeve 2 edge, seed the front stitches. Attach the 3 stitches from sleeve 2 to the body by doing a K2T or a P2T where one stitch is from the sleeve and one stitch from the body. Seed until the front body is 2” shorter than the back – on row 5 put a buttonhole at the sleeve 2 edge I did the buttonhole one stitch from the edge with a simple “yarn over, K2T”. Use whatever buttonhole type you like.
Shape front neck –
Starting at the sleeve 2 edge, seed 9 stitches then put those stitches on a holder. Cast off the next 14 stitches. Seed remaining stitches until front matches back height. Seam these front stitches with the matching back stitches (I did a 3needle bindoff)
Go back to the 9 stitches and put those back on the holder, seed these stitches until front matches back height and cast-off. DO NOT ATTACH TO BACK
Put up all of the back stitches plus 3 more stitches from the top of sleeve 2 (I just picked up the purl ‘bumps’) on the needle. Starting from the sleeve 1 edge, cast off 14 stitches and seed remaining stitches. Make a buttonhole tab by doing seed on the remaining stitches for 8 rows, and put a buttonhole in the center of row 4. Cast off.
Sew on buttons.
Sew underarm seams if you didn’t before. Check if there’s any gaps at the underarms, and sew them shut.
Weave in all ends.
Fold sleeve ends back for cuffs.
To try next time - make the entire front from the underarms to shoulder fold-down-able. Do sleeve 1 the same as sleeve (use 20 stitches instead of 17). Do the front on 30 stitches attaching 3 stitches to the bottom of both sleeves and putting buttonholes on both sides. Do the 'buttonhole tab' on both sides.
Life is not about finding yourself. Life is about creating yourself.
(quote source: coffee mug)
Monday, June 25, 2007
Stacie's Sweater - A baby sweater pattern
A friend of mine - Stacie - is expecting a baby (awwww....) in a few months. So, of course, I had to make something! I had a green chunky yarn that I thought would make a nice sweatshirt-y baby sweater. I couldn't find a pattern, so, I winged it and came up with this -
Subscribe to:
Post Comments (Atom)

No comments:
Post a Comment